nginx之路
不想做运维的后端不是一个好前端
nginx
nginx 其实就是 轻量级 的 web 服务器 、 「反向代理服务器」
啥玩意儿是反向代理
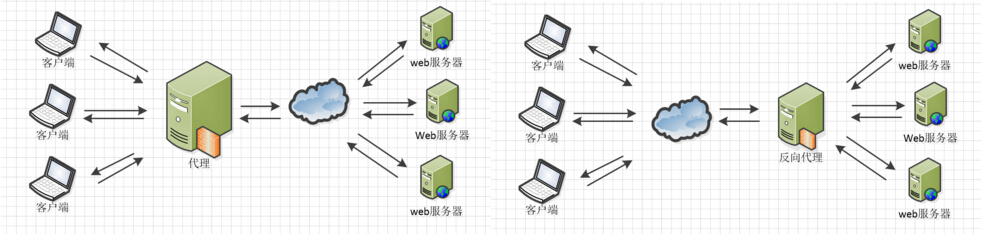
代理
我们在上 google 的时候,因为众所周知的原因,被墙掉。这个时候会用 VPN 来代理请求,VPN 收到请求后,再转发给 google 服务器,google将请求处理结果返回给VPN 服务器,VPN再把结果返回给我们的电脑。
反向代理
我们公司有三台服务器,当接收到客户端请求的时候,要决定将请求转发给哪台服务器,做这个决定的就是nginx,而这个过程就是反向代理。
不同点
代理是客户端知道要访问的地址,而服务端不知道是谁访问的
反向代理是服务端知道请求是哪台机器处理的,而客户端不知道
干啥玩意儿要反向代理
- 老板:小王呀,我们花“重金”买的这台服务器,并发才 8000,用户一多,网站就gg,你优化下,让它达到 20000 呗。
- 小王:不行呀老板,这服务器磁盘io性能太差了,本来网络io能达到20000的,结果我们的请求要读写文件,拖慢了接口处理速度,处理不来服务器就不干活了。接口当然没有响应了。
- 老板:那你看咋整
- 小王:加机器呗,我们这台服务器就负责并发接口,文件io操作的接口交给其他机器做,正常的数据处理走现在这台机器,并发上一万五肯定没问题。
之后,处理小王网站接口分发的任务就交给反向代理服务器了,小王换上反向代理后,老板再也不发愁~
有了反向代理后,前端的后端世界瞬间变得明朗起来,让我先把 nginx 跑起来把
下载
http://nginx.org
brew install nginx
跑完后mac终端竟然报错
Error: The following directories are not writable by your user
网上搜了下是权限错误,收回权限就可以了
1 | sudo chown -R `whoami`:admin /usr/local/bin |
重新执行安装就可以了~
安装完成后打开
localhost:8080
能看到 nginx 的欢迎页面就成功了
运行
先运行小v命令
1 | nginx -v |
是nginx的版本信息
再运行大V 命令
1 | nginx -V |
// 可以看到更全面的信息
// 以配置文件运行nginx nginx -t
nginx: the configuration file /usr/local/etc/nginx/nginx.conf syntax is ok
nginx: configuration file /usr/local/etc/nginx/nginx.conf test is successful
可以看到跑起来啦!
我们可以cd 到配置文件里,改改东西, 比如端口号
events {
    worker_connections  1024;
}


http {
    include       mime.types;
    default_type  application/octet-stream;

    #access_log  logs/access.log  main;

    sendfile        on;
    #tcp_nopush     on;

    #keepalive_timeout  0;
    keepalive_timeout  65;

    #gzip  on;

    server {
        listen       8888;
        server_name  localhost;

        #charset koi8-r;

        #access_log  logs/host.access.log  main;

        location / {
            root   html;
            index  index.html index.htm;
        }
        error_page   500 502 503 504  /50x.html;
        location = /50x.html {
            root   html;
        } on 127.0.0.1:9000
    }


    include servers/*;
}
改成 8888 后,kill 掉 nginx,重新运行
我们的 8080 端口已经进不去了,取而代之的是 8888 接口
pkill nginx
nginx
前端跨域肿么办,nginx出来干
改端口号这种事情太low了,我们来实践一下
之前公司有做过一个需求
a.fuck.com 上的页面要请求 b.fuck.com 的接口,由于浏览器同源策略的限制,请求肯定是不成功的。
让我们再回忆下最开始的图,对于反向代理来说,客户端不知道它访问的是哪台服务器,甚至哪个域名,那用反向代理来“骗”浏览器应该是行得通的!
那么如何设置呢?
server {
        listen       80;
        server_name  a.fuck.com;
        location / {
                proxy_pass b.fuck.com;
        }
}
现在前端的请求发给 a.fuck.com, nginx 拦截后,将请求转发给了 b.fuck.com 去处理,这样通过反向代理,使a.fuck.com 的脚本请求到了 b.fuck.com 的接口。
实战一番吧,首先改hosts文件
127.0.0.1 a.fuck.com
127.0.0.1 b.fuck.com
两个域名都指向本地服务器,然后用 node 模拟两个服务
// a 服务
var express = require('express');
var app = express();
app.use(express.static(__dirname + '/public'));


app.get('/sayBro', function(req, res){
  res.send('no bro');
});
app.listen(3000);
// b 服务
var express = require('express');
var app = express();
app.use(express.static(__dirname + '/public'));

app.get('/say', function(req, res){
  res.send('hello world 3001');
});
app.get('/sayBro', function(req, res){
  res.send('bro');
});

app.listen(3001);
<!-- 在 a 服务下的静态页面 -->
<html>
<script src="https://cdn.staticfile.org/jquery/1.10.2/jquery.min.js"></script>
<body></body>
<script>
// 这样肯定是跨域的!!!
$.get('/www.b.fuck.com/say/', (res) => {
console.log(res)
})
$.get('/sayBro', (res) => {
console.log(res)
})
</script>
</html>
现在我们将 html 模版中的url改为相对路径,此时 a 服务没有对 say 路由进行处理,页面肯定是 404
$.get('/say', (res) => {
    console.log(res)
})
我们需要反向代理,将 say 接口 代理到 b 服务下,只需要改 nginx 的配置即可
server {
    listen       80;
    server_name  a.fuck.com:80;

    #charset koi8-r;

    access_log  logs/host.access.log  main;
    location / {
        proxy_pass  http://127.0.0.1:3000;
    }
    location /say/ {
        root   html;
        index  index.html index.htm;
        proxy_pass  http://127.0.0.1:3001/say/;
    }
}

server {
    listen       b.fuck.com:80;
    #charset koi8-r;
    server_name b.fuck.com;

    access_log  logs/host.access.log  main;
    location / {
        proxy_pass  http://127.0.0.1:3001;
    }
}
监听 80 端口,mac 需要 sudo 权限运行,这里我写了两个 server
第一个server, 当请求域名 a.fuck.com 时,转发接口到 3000 端口,如果是 say 接口,转发给 3001。
第二个server,当域名是 b.fuck.com 时,请求直接转给 3001 端口服务。
再跑一遍,当 http://a.fuck.com/say 时,不再是404,而是 hello world 3001 ,其他请求接口照旧运行。